Build phase
After cloning the repository AppVeyor runs MSBuild to build project sources and package artifacts.
The following command is used:
msbuild <project> /logger:"C:\Program Files\AppVeyor\BuildAgent\Appveyor.MSBuildLogger.dll"
Custom logger is required to push MSBuild warning and errors in real-time to build console. You may use this logger in your own build scripts.
<project> is a Visual Studio project (*.*proj) or solution (*.sln) file. If project or solution file is not specified on project settings AppVeyor searches for the first occurence of *.sln or *.*proj file in the build clone directory recursively.
You may configure your own custom build script (“Script” mode) instead of calling MSBuild or disable build phase altogether.
Automatic packaging of build artifacts
Before running MSBuild AppVeyor analyzes the supplied project or solution file to determine the type and “flavor” of all projects.
Packaging Web Application projects (WAP)
To package Visual Studio WAP AppVeyor runs the following command:
msbuild <wap_project> /t:Package /p:PackageLocation=<web-deploy-package.zip>
This command performs compilation and publishing of WAP into a Web Deploy package. The produced package is pushed to artifacts and can be deployed using Web Deploy or Agent providers.
By default, Web application project artifact deployment name is the same as project name. However, in some cases it can be useful to customize deployment name. This especially makes sense when multiple Web application projects use the same Agent deployment Environment. For Agent deployment, artifact deployment name is a key setting and it would be convenient to have the same deployment name for all projects using certain Agent deployment Environment. To achieve this, provide custom value for APPVEYOR_WAP_ARTIFACT_NAME environment variable.
When creating the package, you can declare that ACLs will not be updated during package deployment. For that set APPVEYOR_WAP_SKIP_ACLS environment variable to true (this will create <IncludeSetACLProviderOnDestination>False</IncludeSetACLProviderOnDestination> record in temporary publishing profile AppVeyor creates on the fly.
Packaging NuGet libraries
If the project folder contains a *.nuspec file (and publish_nuget: true (YAML) / Package NuGet projects (UI) is set) AppVeyor will try to package the project as a NuGet library by calling the following command:
nuget pack <project_file> -OutputDirectory <temp_path>
For example, given the following project structure:
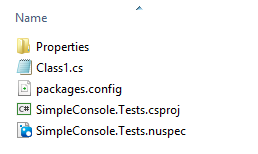
AppVeyor will call:
nuget pack SimpleConsole.Tests.csproj -OutputDirectory <temp_path>
To generate a .nuspec file for your project use the nuget spec command.
Note that this feature works will with AssemblyInfo patching
Packaging .NET Core NuGet libraries
If .NET Core (or .NET Standard) project’s .csproj file contains any of the following attributes
AssemblyName
PackageVersion
PackageVersionPrefix
PackageVersionSuffix
Authors
Title
Description
Copyright
PackageRequireLicenseAcceptance
PackageLicenseUrl
PackageProjectUrl
PackageIconUrl
PackageTags
PackageReleaseNotes
RepositoryUrl
RepositoryType
Version
(and publish_nuget: true (YAML) / Package NuGet projects (UI) is set) AppVeyor will try to package the project as a NuGet library by calling the following command:
dotnet pack <project_file> --output <temp_path>
Note that this feature works well with .NET Core .csproj files patching
Packaging Azure Cloud Service projects
If Azure Cloud Service project (.ccproj) is found with the solution AppVeyor will create Azure Cloud Service package (.cspkg) using the following command:
msbuild <ccproj_file> /t:Publish /p:PublishDir=<temp_path>
Created Cloud Service package (<project-name>.cspkg) and default “Cloud” configuration (<project-name>.cscfg) will be published to build artifacts. In addition to that all .cscfg files found in Cloud Service project folder are pushed to artifacts with names <project-name>.<config>.cscfg.
Selecting cloud service configuration
By default, MSBuild uses <project>.Cloud.cscfg cloud service configuration, but you can specify which configuration to use by adding a TargetProfile environment variable, for example:
| TargetProfile | Staging |
Caveats
While trying to build an Azure Cloud Service project you may get the following (or similar related) error:
The imported project "C:\Program Files (x86)\MSBuild\Microsoft\VisualStudio\vX.X\Windows Azure Tools\2.X\Microsoft.WindowsAzure.targets" was not found.
To fix this error add the following environment variable on the Environment tab of project settings:
| VisualStudioVersion | 12.0 |
where 12.0 is your version of Visual Studio (VS 2013 - 12.0, VS 2012 - 11.0, VS 2010 - 10.0).
See also: